Anatomy of a scenario: Sérénité
In a previous update, I briefly introduced a new project we’ve been working on: Sérénité. In this post, we’ll dive deeper into the making of the scenario for this experiment, and how Unreal makes everything awesome.
End result
Let’s start… from the end? Below is a video of the end result. Well, not quite the actual final render, but some intermediate render used to review the overall scenario. It’s still fairly close to the end product, so that’ll do. You can fast forward through it, as believe me, the scenario is boring (very much by design).
Now that we’ve seen what we’ve created, let’s dive into the how it came to life, which actually is much more interesting than this rather uneventful scenario.
Requirements
For this experiment, the requirements for the driving simulation side of things were fairly explicit and easy to understand.
- Fully autonomous scenario (no user input required)
- 3-lane highway
- Start and finish at a rest stop
- During this highway ride, we’ll encounter
- A fixed amount of cars
C - On any lane (opposite or same direction)
- For cars on our side, we should overtake some, and others should overtake us
X% of cars should be white, the others being colored- White cars should appear at time interval between
T1andT2- Strict interval
- Totality of spawn time intervals should average to the specified range’s mean (
(T2-T1)/2)
- A fixed amount of cars
Twist: we’ll actually need two of those, one with a D1 minutes duration, the other D2 minutes (the amount of cars C being adjusted accordingly between the two).
Scene
For the scene we’ll need two things: a highway, and one or more rest stops. For the highway itself, we’ll go with a ring, because we can drive endlessly on it (well, at least until the participant realises they’re just going round and round).
Highway ring
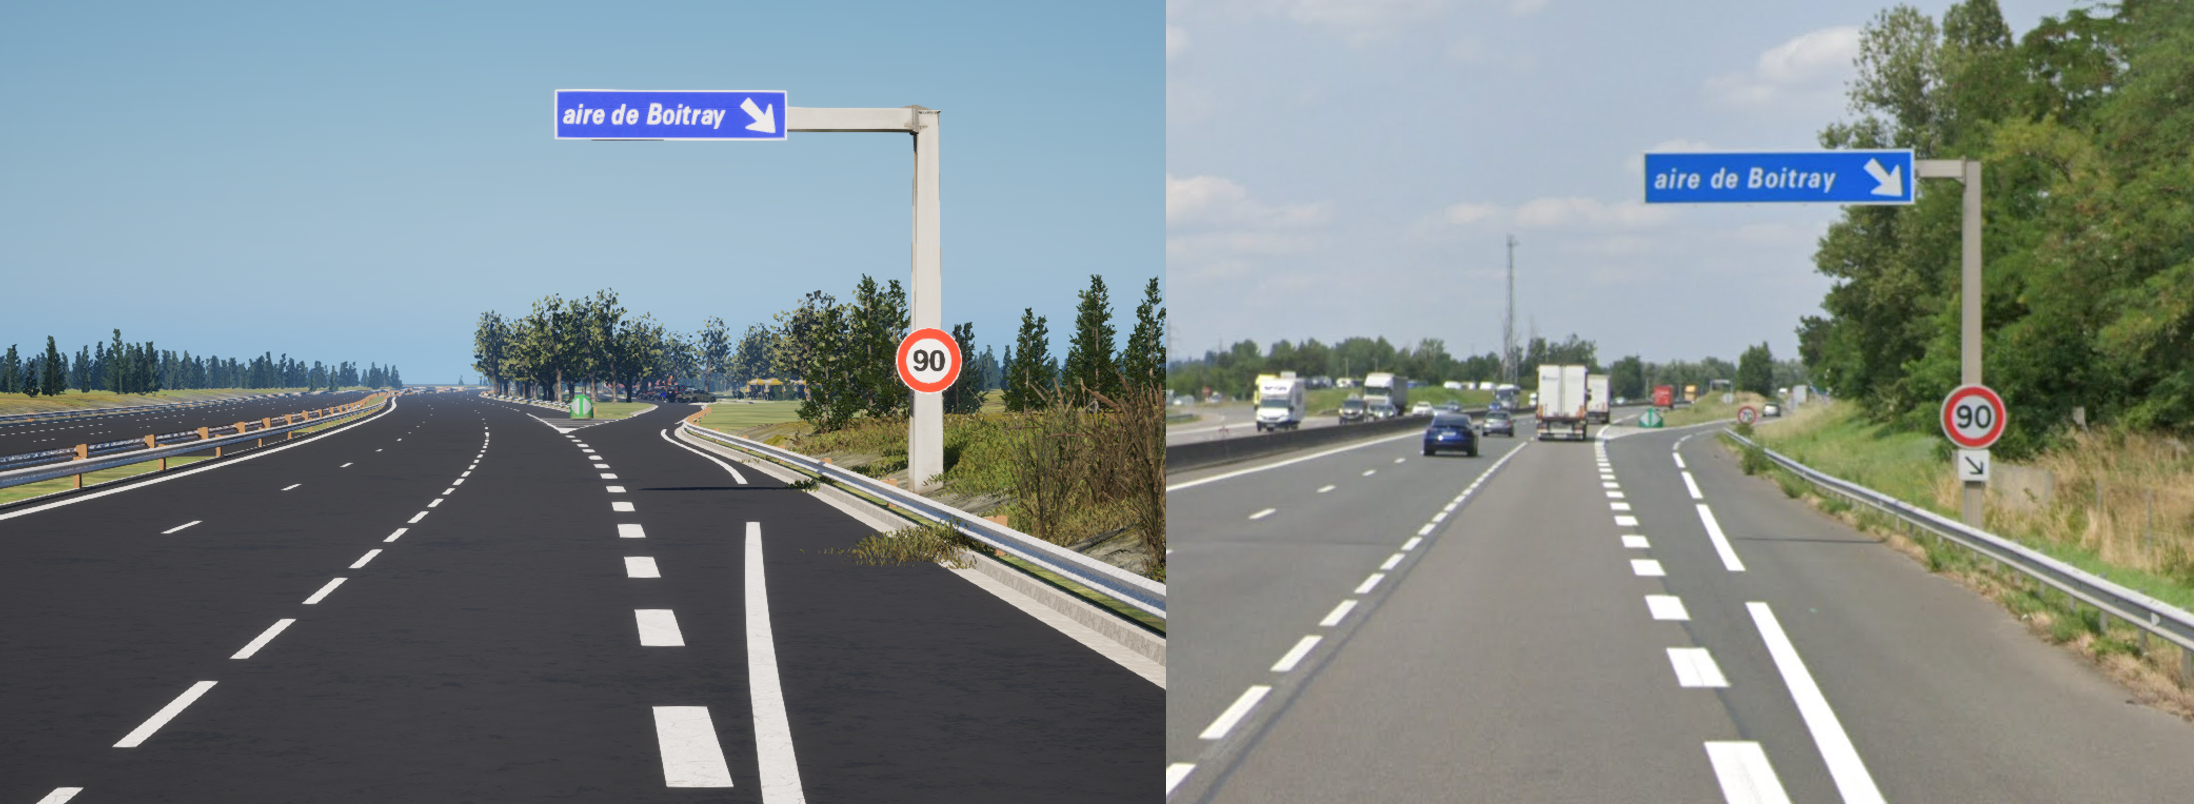
For another earlier and unrelated project, I had made a somewhat okay highway ring using RoadRunner, which actually never ended up being used.
From what I recall, I just drew a ring on RoadRunner and added some elevation and curves to make it less boring. Then I imported it in Unreal, added a Landscape, applied my favorite auto-material on it and auto-sculpted it based on OpenDRIVE data. And that was pretty much it.
Since this scene had now moved up from “prototype” to “actually used”, I had to go back to RoadRunner to ensure that curves followed the rules of French highway design: if possible, curvature radius should stay above 2000m, and should never go below 800m. Rules which apparently are very much not the defaults in RoadRunner.
Rest stop
Now that we had a nice ring, we needed a rest stop. Do you know what the road geometry of a highway rest stop actually look like? I certainly didn’t. But thanks to our overlords over in the Silicon Valley, Google Earth and Street View both exist.
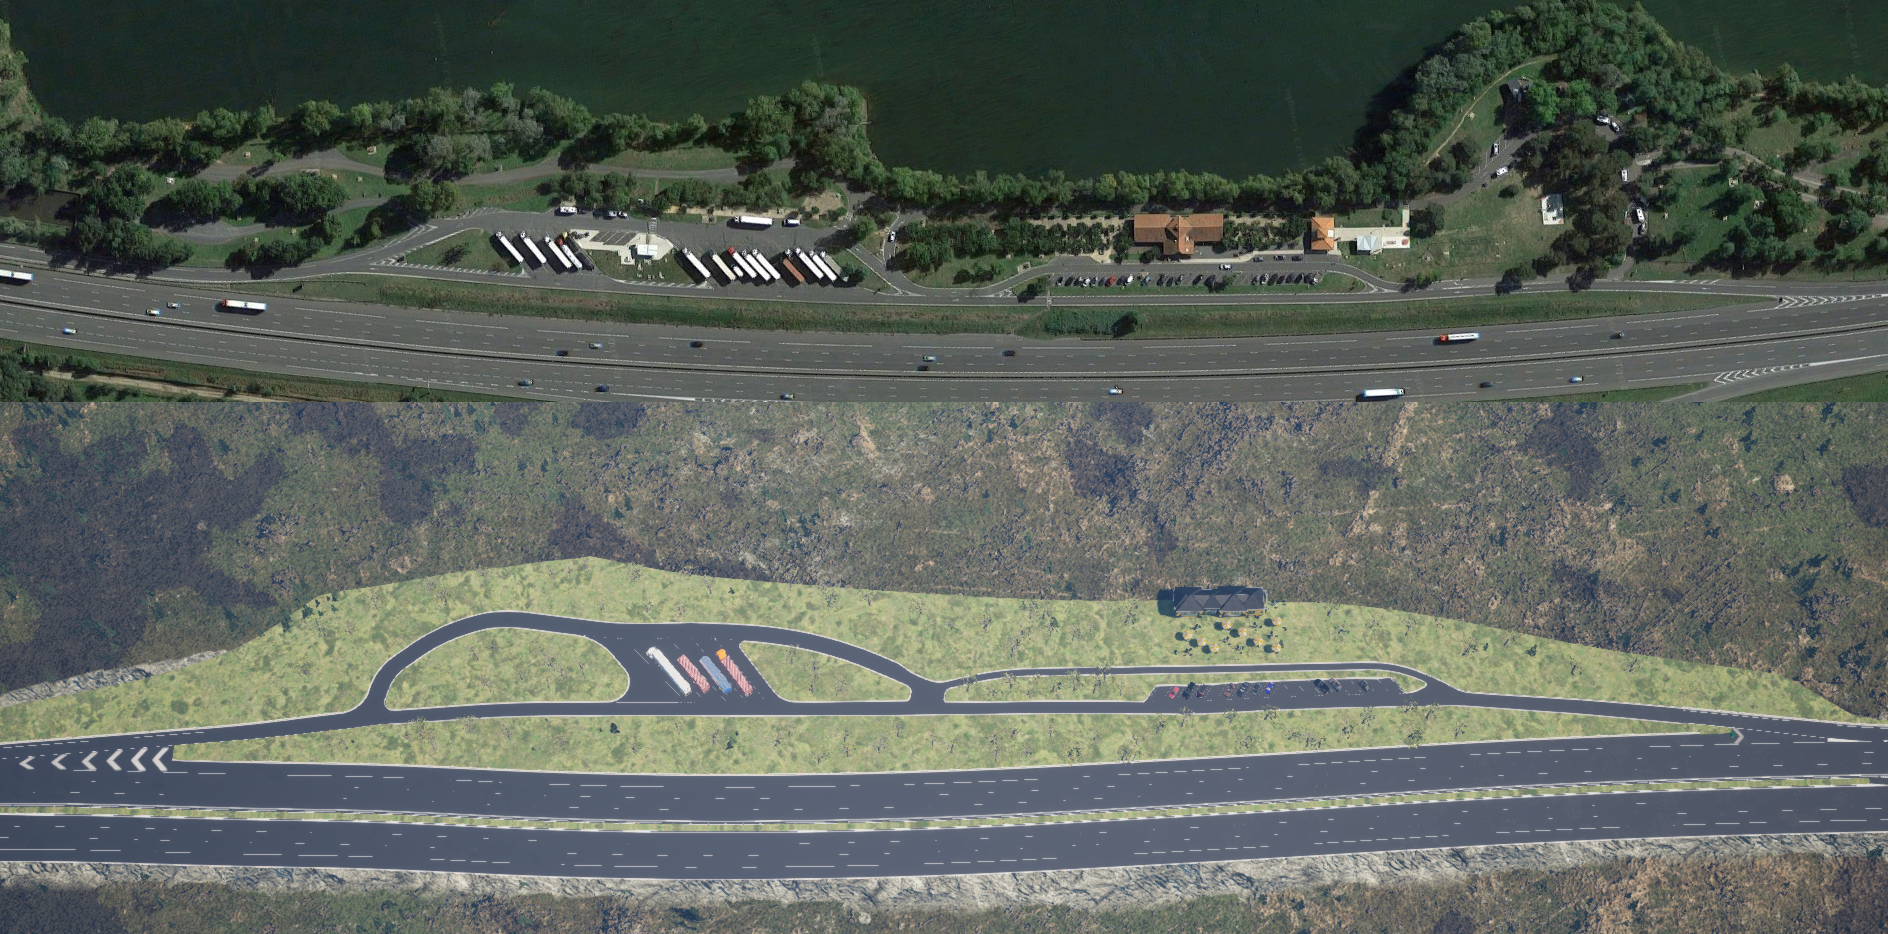
So I used a random rest stop from around my childhood home as reference, and just went about creating something similar in RoadRunner. Which, thanks to RoadRunner’s amazing tools, didn’t take much time.
Then I imported that in Unreal, did a bit of back and forth between the tools to fine tune some things (mostly lane markings). In Unreal, I added some props and foliage and that was it!
Shout-out to Marketplace creator Der Sky, whose “European Collection: French Highway” product is absolutely perfect for this use case. Go check their products, if you need road props and signs, they most likely have what you want.
Scenario
Design choices
The scenario was the really interesting part of this project. From the requirements, it might look like a boring scenario (it was designed that way for experimental purposes), but let’s have some fun with this!
Hand-crafted
One very un-fun way of implementing the scenario would be to do it by hand. Meaning, hand placing every one of the C vehicles on the road, giving each of them their speed and other goals, ensuring that the placement follows the various requirements.
This would work. It would also probably be the fastest way. But also the most boring one, and most importantly, the least flexible. What if we decide to change the car count? Or the timing between them? That would lead to a lot more work down the line.
Procedural
Another approach would be to procedurally generate the scenario based on the actual requirements. After all, it doesn’t seem to be that hard to translate those to code, and exposing the variables for the researchers to play with. That way, if they decide to change the timings, duration or car colors, it would take a simple button press to generate a new scenario.
Yes, but… A procedural scenario is tricky to get right. You have to ensure you don’t get into some weird situations, like cars getting too close to one another. And it’s also harder to fine tune: if the researchers say they like this iteration of the procedural scenario, except for this car at 3min42s that’s a bit too fast, you can’t easily just change that without changing everything.
Why don’t we have (a bit of) both?

Why indeed. It would be great to have both the control and fine-tuning of the hand-crafted method, all the while having the high-level and heavily automated features of the procedural way. And the answer to that is…
Data Table
Data Tables are great. They’re basically CSV files. Or Excel spreadsheets if that’s your thing.
And we can think of our scenario as a spreadsheet! Each row would be a car to spawn. And for columns, we’d have the time at which it should spawn, its color, its lane, etc.
Working with this “intermediate” format gives us the best of both world: if we want to go the “hand-crafted” way, we can just write it ourself. If we want to go the “procedural” way, we can just ask our friend Python to do it for us.
And if we want a bit of both: we procedurally generate a “reference” scenario, which we then fine-tune based on testing and feedback. Which is exactly what I did.
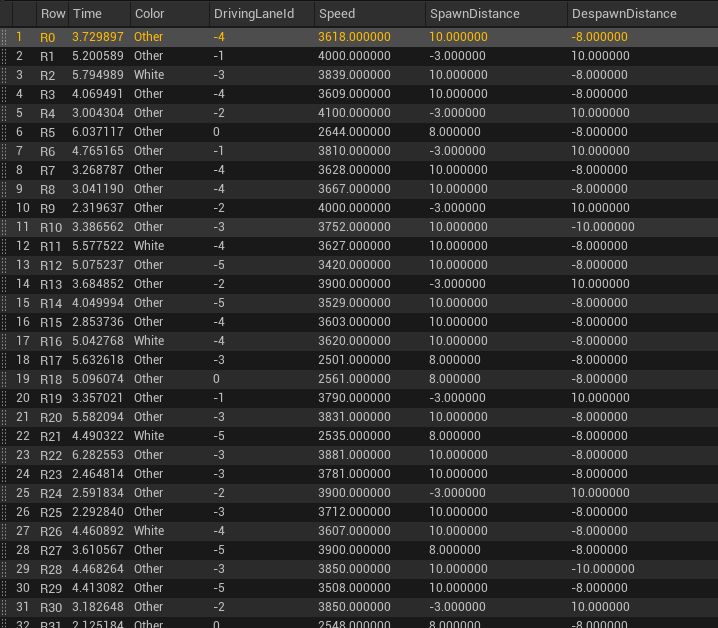
Above is an intermediate scenario we worked with during development. It was first generated by a Python script that took as input the experiment variables (e.g., car count, time range between spawn). Then, I fed that file to a very simple “scenario player” that I wrote (in Blueprints), and just played it. Obviously some lines needed tweaking, to avoid visible spawns in some locations, or to give a more “realistic” feeling to some behaviors.
Debug display
Debugging and fine tuning of this “spreadsheet” scenario can be difficult. Because when I’m just Playing In Editor and after a while I see a car going a bit too fast for my taste, how do I match it back to the correct row in my Data Table?
I chose one of the most overkill solution: I created a runtime text-to-billboard(/sprite) component, that is attached to each car as they spawn. That way, when researchers and I are discussing some car behavior that needs adjusting, there’s no doubt which line of the CSV needs to be tuned!
Start/finish
With the main part of the scenario now completed, there was still work left to do. For instance, we still needed to get out and then back into the rest stop.

This didn’t take much time: we already have quite a few Virtual Driver-related Trigger Boxes, and I created the missing few that were needed. And as always, make sure to add custom thumbnails to your Blueprints, it makes browsing through them much easier.
Overtake
The only thing left to do was to make it so Ego would overtake slower vehicles that would appear in front of it.
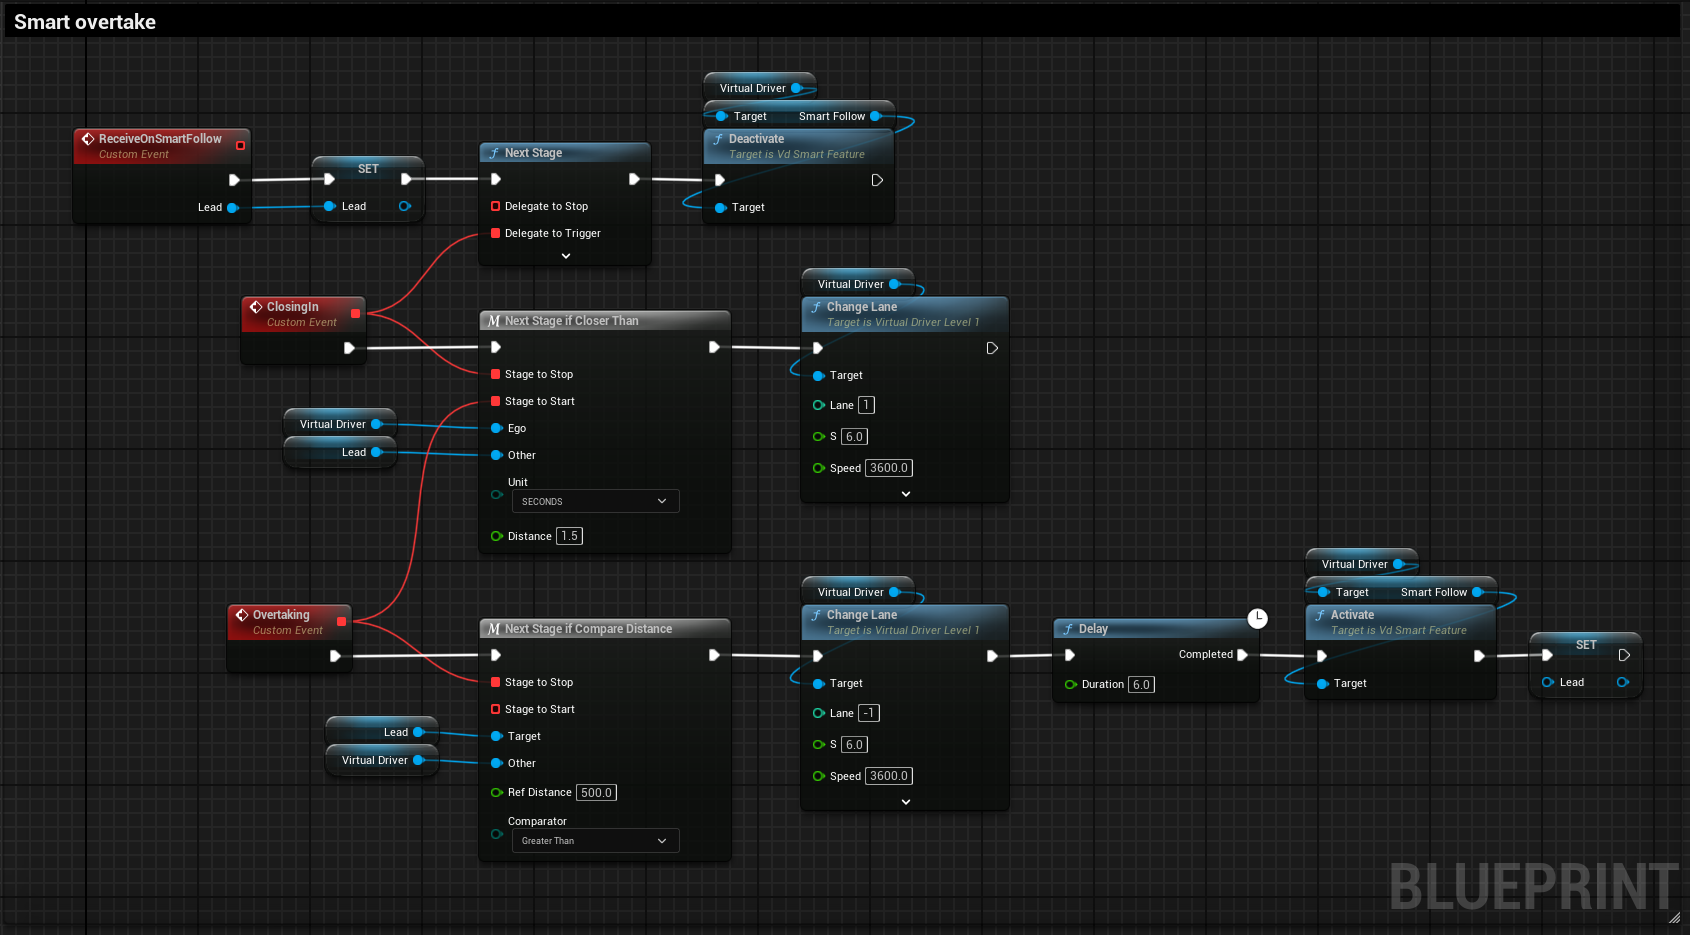
Here also, our Virtual Driver had most of what we needed. One of its “Smart Features” is to follow any car that it may catch up on. So we simply bound to that event, and instead of following, we just overtake.
One little caveat is that this doesn’t handle cars already being on the overtaking lane (e.g., blindspot): the Ego vehicle overtakes no matter who might be in the way. But during play, if I noticed any such case occuring, I would simply edit the scenario Data Table to move the annoying car out of the way, either to another lane or farther ahead/back.
Movie rendering
Since this scenario is fully-autonomous with no user input, and the target hardware is a single computer with three monitors, we can render the scenario into a video instead of having it run in realtime. This has multiple benefits: improved visual quality, perfect framerate, etc.
This part turned out to be quite complex, and I ended up doing a lot of back and forth between the legacy renderer, and the newer Movie Render Queue (MRQ). In the end, I chose MRQ, but the process wasn’t as smooth as I hoped it would be.
Overall, Movie Render Queue is really an improvement over the legacy pipeline, and using it is pretty straightfoward. One thing that was really appealing was the nDisplay Movie Render Queue pipeline, which allows rendering video for all viewport of any nDisplay cluster.
However, since the MRQ-nDisplay is a relatively new addition to Unreal, it has some limitations that I discovered along the way. First, the command line doesn’t seem to support it, which is a shame because I had already taught our Discord bot the new !render command. Second, the encoder also doesn’t seem to support nDisplay rendering, meaning that I had to encode myself (which is rather easy using FFmpeg). But since I couldn’t use the command line in the first place, I couldn’t automatically trigger the encoder afterwards, so nightly renders were impossible.
And last but not least, Movie Render Queue doesn’t support spatialized sounds, which obviously is an issue for us, as all our sounds are spatialized. As a workaround, I de-spatialized all ego-vehicle sounds, and said goodbye to all other vehicles’ sound (which is not that big of a deal for a highway scenario).
So the rendering required more work than expected, but the end result was really good. It seems Epic has a lot more work planned for the Movie Render Queue, including a very interesting Movie Render Graph.
Conclusion
This project was really fun to make, and I learned quite a lot of things in both RoadRunner and Unreal. I feel like a broken record, but those two tools really are empowering us so much to do amazing things. And let’s not forget esmini, whose maintainer was key in tracking down and fixing a tricky bug. After all, everything we do with OpenDRIVE relies on their amazing work.
With all that done, I already started using my new MRQ skills: for documentation purposes, I decided to render movies of all our current (and future) scenarios. See you for the next one!