Live VR eye-tracking data visualization
Eye-tracking is widely used to study driver’s behavior in simulated environments. However, we’re used to either have glasses (e.g. Pupil Core) or fixed setups (e.g. Smart Eye Pro); and the newly released VR headsets with included eye-tracking (e.g. Vive Pro Eye) bring both new opportunities and challenges. Today, we’ll talk about live visualization of eye-tracking data, why and how we managed to implement it in our platform.
I've managed to display live VR #EyeTracking (Vive Pro Eye) data on a #UE4 spectator screen, which is recorded alongside raw data with #LabStreamingLayer. I'll probably write up a blog entry about this, as it's not trivial but really useful to have. pic.twitter.com/hgNsn3cpgk
— Bertrand Richard (@brifsttar) November 16, 2021
Eye-tracking data
Traditional
So before getting into the details, it’s important to mention why we use eye-tracking, and what type of information we’re looking to get from it.
Whether in CAVE or with VR headsets, we want to know what the driver is looking at, and most importantly when, in relation to events happening in the scenarios. For example, one common question in car and pedestrian interaction is
Did the driver see the pedestrian? If so, how far were they when it happened?
For the when part, we’ve already covered at least part of it in our data collection article, which dives a bit into the multiple data sources synchronization problematic. But to sums things up, this is the easy part, thanks to tools like LabStreamingLayer.
The what part, on the other end, is usually quite challenging. In CAVE setups, it’s fairly difficult to get the information of the actual object in the simulated world being looked at, and getting more accurate than that (e.g. what part of the object) is nearly impossible. This is mainly because both the participant and the scene are dynamic: ego and NPCs both are moving in the world, pushing even the advanced workflows (e.g. dynamic area of interests) to their limits. And when you add on top of that the inherent relative inaccuracy of eye-trackers, it gets really complex to automate any kind of data-processing about what the participant is looking at.
Since we mainly work with glasses, our best alternative has been manual annotation. That is, after the experiment, we go over each video and manually annotate what object is being looked at, based on the “red dot” which is overlaid on the scene video (captured from the glasses), using eye-tracker processed data.
It’s obviously time-consuming and not very reliable, but given our set of constraints, it’s the best we can do.
VR headsets
But then came VR-headsets with integrated eye-tracking, which changed output data and downstream workflows quite a bit.
The main change is that the what issue is now much easier. Since both the eye-tracker and the displays are in the same reference frame (headset), eye-tracking gaze data can now be converted to the simulated world coordinate system without much overhead. In our case, the SRanipal Unreal Plugin can give us the scene actor being looked at, with no post-processing needed! So no more manual annotation and all its downsides; we can, at runtime, know what actor is being looked at. This makes post-processing analysis way easier.
Why live visualization?
So, if eye-tracking-VR-headsets are so great and can tell us, in realtime, what object is being looked at; why would we want a live “2D-red-dot” visualization, that was previously only used as last resort for manual annotation? Indeed, that video should be pretty much useless to us now.
Well, multiple reasons. The first is that such video is still useful during the analysis phase, for example if you want to get a quick glimpse at the dataset. For humans, a video with a red dot is much easier to understand than a time series dataset, and if you want to get a “feel” of your data, it’s great material.
Second is that the eye-tracking data, whether in VR or glasses, still has accuracy limitations. Meaning we can’t blindly trust its “actor being looked at” data, because it might actually be wrong. And during our tests, we found that it was way too often wrong. Whether you have multiple objects in close proximity at far range, you’re looking at the edge of an object, or a simple offset from the calibration; many things can induce errors in that high level data.
If we look back at the example from the top of this post, I was actually looking at the two wheels, then the licence plate. But the “object being looked at” data just says “ground”. Quick disclaimer though: I didn’t calibrate the eye-tracker before recording this, so usually we don’t have that big offsets.
The third reason behind the need for this type of visualization is as a safety measure so that the experimenter can check, during the experiment, that the eye-tracker is working as intended. We could (and will) also implement live smoke tests for that, but having a medium for a human to verify it is always a benefit and reassuring for the experimenter.
A final advantage to having the video is that it can easily be used to illustrate specific cases in publication, conference or simply when discussing between colleagues.
Implementation
Now that we’ve explained why we want “red-dot” live visualization for VR eye-tracking data, let’s dive into how we actually implemented it in our Unreal Engine simulation platform.
Spectator screen
One obvious thing is that we want the live eye-tracking visualization to not appear in the participant’s headset; only the experimenter should be able to see it. That’s where the Spectator Screen comes into play.
As its name suggest, this screen is used to spectate the world the participant is currently interacting with through the VR headset. The view offers multiple display modes, one of which is named TexturePlusEye, and allows displaying a view as seen from the participant, fitted to ths spectator screen ratio, with a texture overlaid on part of it.
So our idea was to use this spectator screen mode and somehow overlay a UMG Widget on top of it. The widget would not only be used to draw the eye-tracking data, but also other experiment data.
UMG Widget
The spectator screen accepts a texture as input, but a UMG widget isn’t exactly a texture. How to connect them both?
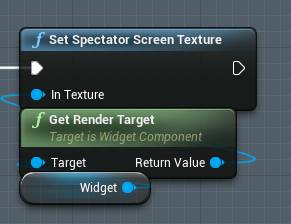
Well, you can use a Widget Component and call its GetRenderTarget method, which is a valid texture for the spectator screen. Before doing that, you need to configure the right render/display size on the widget, the component and the spectator screen; otherwise you can get a very distorted overlay.
Our widget is mostly empty, meaning the eye view under it will be visible on the spectator screen. Otherwise, an opaque widget will obviously hide everything.
Drawing
Now we’re able to render a UMG Widget on the spectator screen. But how do we draw eye-tracking data on the widget?
First, we need to know what data we’re getting from the eye-tracker. One thing is for sure: it won’t give us 2D gaze coordinate in spectator screen coordinate. What’s the closest thing we have? Alongside the actor being looked at, we also have the gaze target, which is the 3D world coordinate where the gaze is currently aimed at.
Next up is converting this 3D world coordinate to 2D spectator screen space. Thankfully, there’s a built-in method for that! Project World Location to Widget Position does just that, and magically solves that otherwise not trivial issue.
We’re almost done, we now just need to draw a circle at that point, and that’s it! Well, actually, it’s easier to draw a box (Draw Box), so we’ll settle for that. While we’re at it, we might as well buffer the last 10 gaze points, and draw all of them (with reducing sizes over time) with lines connecting adjacent gazes.
And voilà, we now have live eye-tracking data displayed on the VR spectator screen.
Recording
So there’s one bonus step, which is recording the live visualization and synchronizing it with other datastreams (e.g. raw eye-tracking data).
As mentioned earlier, we use LabStreamingLayer for data collection, so the idea is to send all that data to it. Can we send video to LSL? The answer is kinda. There’s an open-source component for that, called VideoAcq, but it’s not really perfect for us. So instead we built our own small video component, which add small features, such as remote control (used alongside LabRecorder’s) and IP camera support. Maybe this will be open-sourced down the line, but for now it’s only used internally.
And finally: how do we grab the spectator screen video feed so that it can be sent to LSL? Given that we tend to separate the data acquisition computer from the simulation computer, we chose an HDMI to USB screen grabber from StarTech, which does exactly that. With that tool, the video stream from the simulation computer is seen as a standard UVC device (e.g. webcam) from the data acquisition computer.
So with all that, we can now not only display, but also record live eye-tracking data on a VR spectator screen. That’s more data for us to actually look at, and a nice visualization for our next on-site demos!