Anatomy of a scenario: snowy mountain road
A while ago, a researcher at my lab asked me: “Now that we’re using Unreal Engine, could we have things like mountain roads? Maybe even with snow?”. The answer is yes, and in this blog entry, I’ll explain how I implemented this short demo.
Context
Before getting into details, I first need to give some context as to why I ended up making this demo.
In the world of driving simulation, most tools are rather outdated compared to what video games can be. And in a lab where driving simulation is just another tool used to study cognition, we were not necessarily on the bleeding edge of realtime rendering technology. Our move to Unreal Engine is still quite fresh, and researchers don’t necessarily know just what can be achieved with it compared to the previous tools they’ve been using for decades.
But it’s not just about showing a glimpse of what’s possible to researchers; it’s also a way for me to actually learn how to do it. Before making this demo, all the roads I ever created were at a constant height of 0m, and the weather was sunny all the time always. So even though I was fairly confident that all of this was possible, I might as well make sure it actually is.
Road
As always, we start with the road. Even though we don’t see any asphalt in the demo, we still need a road: we need an OpenDRIVE description to make a bunch of things easier, like adding traffic.
Since I know pretty much nothing about mountain roads geometry, I opened Google Earth Pro and exported an image of the only mountain road I ever drove on, which is lost somewhere in the middle of gorgeous Lozère.
Then I imported that as a backdrop in RoadRunner, and just drew over a single ~3.5 km road.
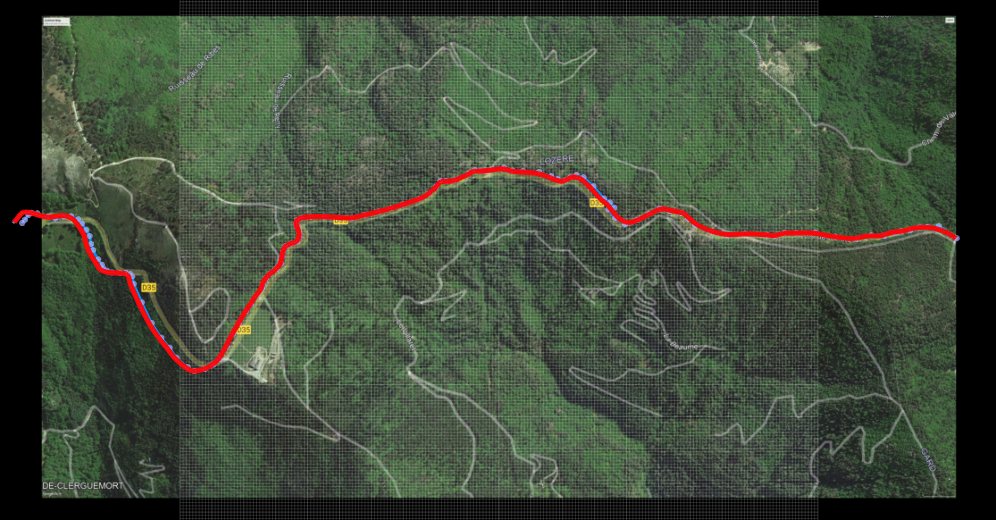
RoadRunner has very intuitive tools to handle both road altitude and superelevation, which are also both supported in the OpenDRIVE standard. For altitude, I got real world values from Google Earth; and for superelevation, I just went with what felt okay.
And that was it for the road. I exported it to Unreal (using Datasmith), and I actually never even went back to RoadRunner after the first export. I think I love RoadRunner as much as I hate MATLAB, so it evens out for MathWorks.
Landscape geometry
The landscape was hand-sculpted using Unreal’s Landscape tools, which are just super easy to use.
To have the road fit on the landscape, I initially planned on using my OpenDRIVE’s plugin fancy Landscape Sculpting feature, which kind of worked, but also kind of didn’t: though the landscape was mostly lowered/raised correctly, road superelevation wasn’t taken into account, which lead to the road levitating on one side, and landscape bleeding through on the other. Not great.
The reason is that the auto-sculpting feature relies on generating splines that are then fed to EditorApplySpline (which, believe it or not, isn’t available in C++, only in Blueprint). However, that function doesn’t support spline roll (which in our case is superelevation). It has basic start/end roll support, but that wouldn’t work for reasons I won’t cover here.
So I had to come up with a solution that required me to do some work, ugh. Lucky for me, Unreal has Landscape Splines, which are like “advanced splines” that are pretty much made for roads (or rivers). Since documentation on using those in C++ was rather sparse, I browsed through Unreal’s source code (which I honestly love being able to do) to get a better understanding of how they’re created in editor. And from there it didn’t take long for a new CreateRoadSplines Editor Utility to show up in the OpenDRIVE plugin. Yay!
With the Landscape Splines perfectly aligned with road superelevation, aligning the landscape was now just one click away!
Material, foliage and weather
This section can be summed up in one word: Marketplace.
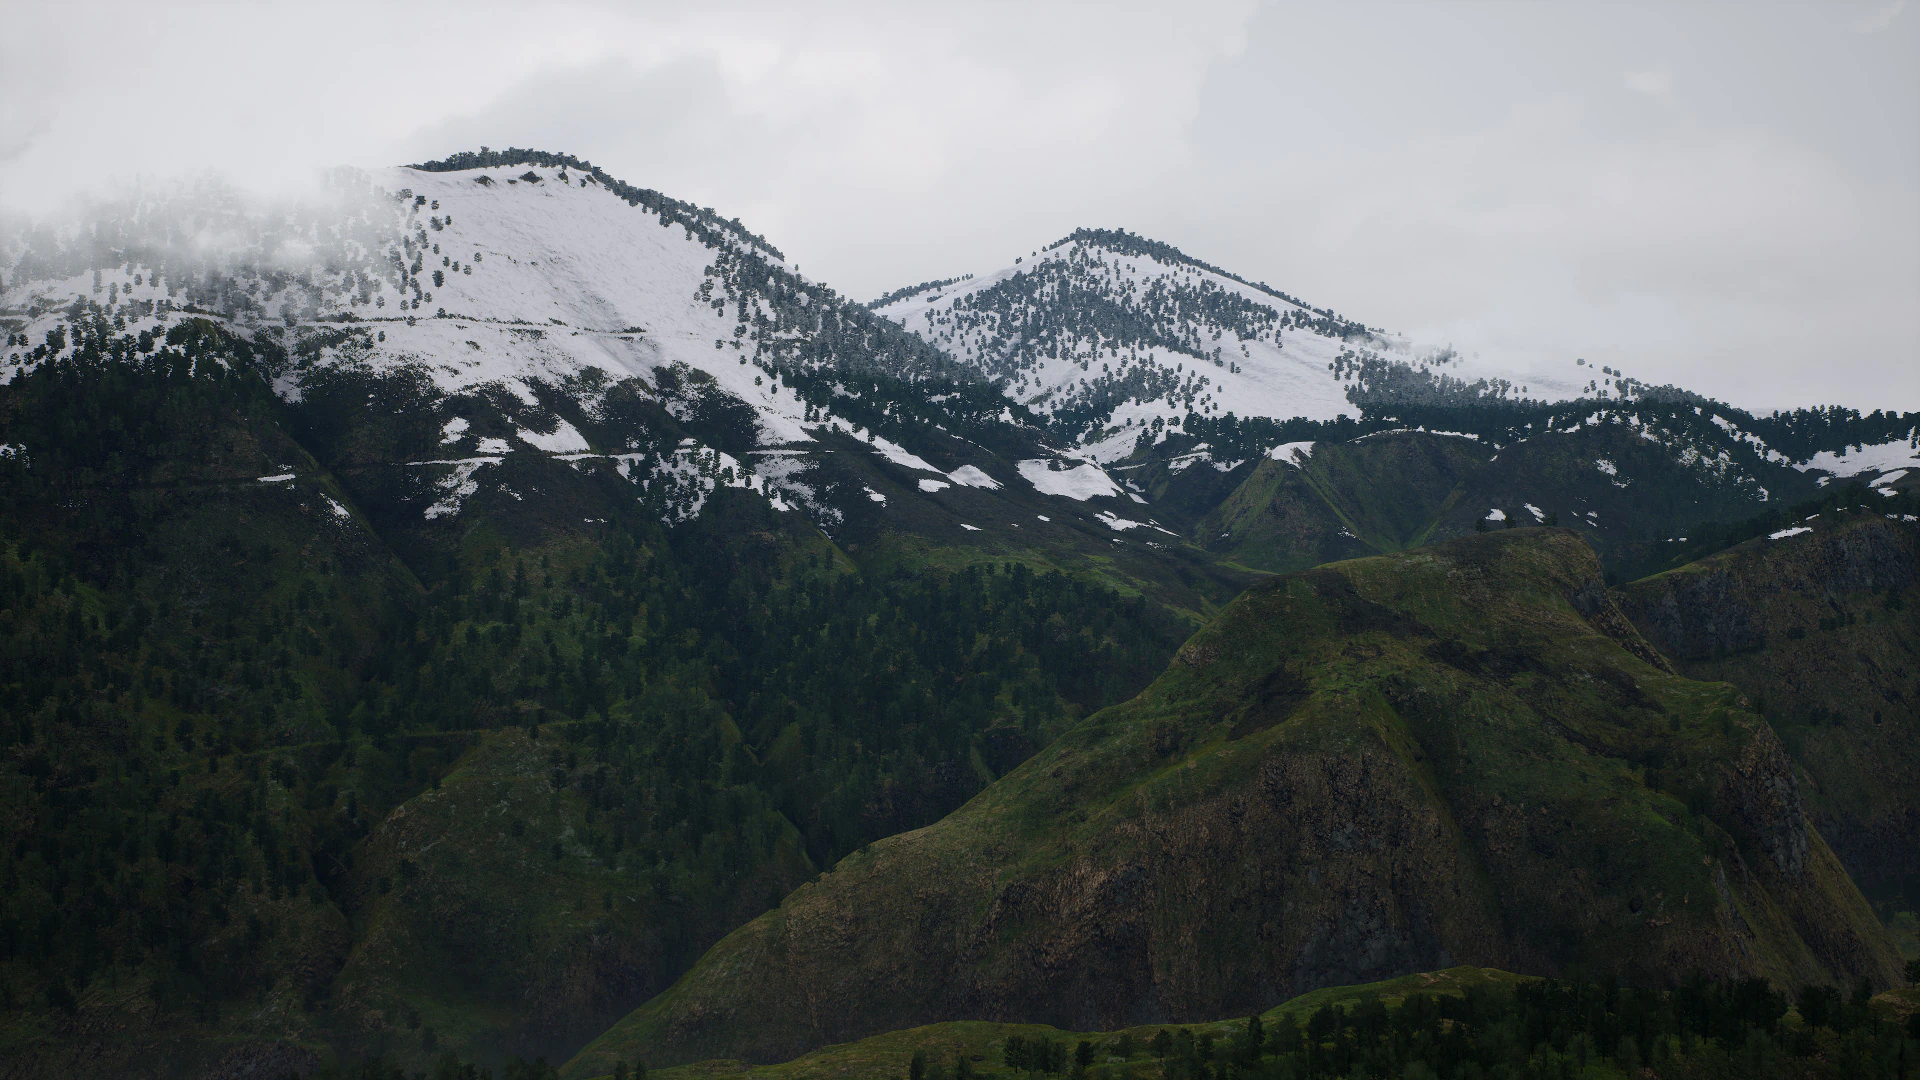
For the landscape material, I used my favorite one which includes 7 layers, foliage, rocks, a gazillion options and is absolutely gorgeous.
Since the “hand-sculpted” part of the landscape unsurprisingly turned out to be quite ugly (remember, I have invested 0 points in the creativity skill tree throughout my life), I figured I might as well hide most of it behind trees. Since the ones from the material mentioned above weren’t enough, I hand painted a few from various Marketplace packs using the Foliage tools.
The weather is 100%-default-presets-only Ultra Dynamic Sky, which everybody should own because it’s awesome.
Tire marks
For tire marks on the snow, I really wanted to automate that and not have to manually draw splines over the road. I assumed that RoadRunner would be able to do that, as it has tools for both lane marking and props spanning a road, but sadly neither really works for that use case.
In Unreal, we use a lot of spline meshes (using NV Spline Tools) that would be very useful here, if only the splines could generate themselves… Well, at this point I’m getting pretty good at generating splines (or duplicating actors) along roads, so it didn’t take long to add a button to do just that.
That left just the question of what mesh to use for the actual tire marks. I remembered that SilverTm’s gorgeous Construction Site has crawler tracks which look really good. I just had to edit the texture to change the brown dirt color to a greyish compressed-snow-on-asphalt, and that was it for tire tracks!
Cars
With all the environment done, it only left traffic to manage. This was the easiest part, given our Virtual Driver is really good at that.
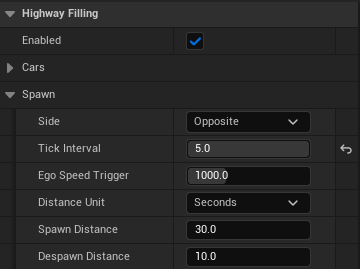
In this case, it was as simple as using our Highway Filler component. As its name suggests, it’s designed to fill the opposite side of a highway with never-ending traffic. But it actually works with any type of road, as long as you don’t have too many junctions, which is exactly the case for our mountain road.
Snow plow
The snow plow wasn’t bought from the Marketplace, but from CGTrader. I was rather wary, since you never quite know what you’ll end up getting when buying stuff there. It turns out the model is well optimized, has all the textures you’d want, and is available in .blend format, so it was perfect for me.
Before importing it to Unreal, I rigged it in Blender in order to create the Control Rig later. The main idea is to be able to control the plow as you would in real life; but since it’s not really useful for that demo, I didn’t implemented the control rig (yet!), I just did the skeleton.
For the snow “spray” (or whatever it’s called) in front of the blade, it’s a simple Cascade Particle System (not even Niagara) that I found in the Drivable Cars: Advanced pack from the Marketplace. Since it was initially a simple small water spray, I had to tweak it a bit to make it denser and more snow-looking.
Conclusion
Making that demo was awesome for so many reasons. First, I learned so many new things, I discovered and fixed quite a number of bugs in my OpenDRIVE plugin, and even added some new features.
But most importantly, that demo showed our researchers just the extent of what is now possible in our simulators. Before using Unreal, a scene like that was simply not feasible for us. Now that they’ve seen that, they’re bustling with ideas and situations they could now study, and I can’t wait to see what new research will come out of all that.
And to finish with a really great fact: that demo took less than 12 hours of work! A good ~60% of that time was spent on the new OpenDRIVE to Landscape Splines feature, another 20% on squashing nasty bugs in the OpenDRIVE plugin, which means it only took a couple of hours to do everything else! All that thanks to the power of RoadRunner, Unreal Engine and its Marketplace.