Workflow in progress #2
Second entry in a series that takes a closer look at how we actually get our driving simulation experiment from paper to the simulator. This time, we focus on a project where the workflow ended up being very different from our previous entry.
Context
Whereas the previous project involved researchers accustomed to driving simulation, this new one is from a biomechanics lab, where the subject of immersive simulation is completely outside of the usual experiment realm. Which means multiple things: they don’t really know what’s possible and what isn’t, nor how things usually go “from paper to simulator”.
Which is actually really good! Because if your mind isn’t stuck in some old ways of doing things, it’s much easier to accomplish great new things. And since this project is a first for this lab, they decided to have very reasonable expectations and goals with regard to driving simulation, which is a very sound decision.
There are mostly two persons involved in this project: a postdoctoral researcher, unfamiliar with driving simulation but very eager to use it, and myself, who work both as tool developer and user in this project.
Kick-off
So how do we actually get started in this kind of settings? Well, without going too much into the actual scientific details, the project involves the takeover of an autonomous car, so we’re not exactly short on literature or scenario examples.
We quickly decided to go with the common cut-out scenario, which worked great for our requirements. But with the added particularity: the experiment will require the participant to perform more than 30 takeover on this exact scenario. That subtlety will be important later on…
For this project, even though the scenario might sound boring (I’ve probably implemented over 20 different cut-out scenarios in my relatively short time doing this job), I wanted to make this project exciting. So since it’s mostly just two of us on the “driving simulation” front, and my researcher colleague was super excited about this, we decided to try and move fast. The scenario is overall simple, so let’s try to go from paper to simulator quickly, and then iterate; because seeing the thing running on actual experiment hardware makes it easier to decide what works and what doesn’t. In other words, Agile driving simulation experiment development.
MVP
A minimum viable product (MVP) is a version of a product with just enough features to be usable by early customers who can then provide feedback for future product development
How fast can we get from a scenario idea, to a minimum viable product running on our mid-range driving simulator?
Well, when your scenario is basically a cut-out takeover, the answer is “less than day”. If you don’t mind me randomly deciding to use a flamingo instead of a car, that is.
Let’s go over some of what happened in those few hours.
Scene
First, I started RoadRunner, drew a 20km road, applied a custom highway road style I had previously created, exported it; and that was it for the road creation.

Next was the scene. Highway scenes are so much easier than urban: create a landscape, add an auto-material on it, auto-sculpt it (the feature also auto-paints it) it, and voilà, you now have a 20km highway in a beautiful nordic european forest setting.
Scenario
Now, for the scenario. Using our Virtual Driver, we can very easily implement the actual cut-out using Blueprints.
But how about some traffic on the other side of the highway? It’s not an uncommon request, so a few months ago, for another project, I implemented a small component that can be attached to any actor, and that will randomly spawn (and despawn) oncoming traffic at given bounds. So in this case, it spawns cars 30s ahead of ego, on a random lane, at a speed around 10% that of ego. And they’re despawned when 10s behind ego. The component relies on both OpenDRIVE information and Virtual Driver, so in the end it’s actually a rather trivial implementation.
Simulator
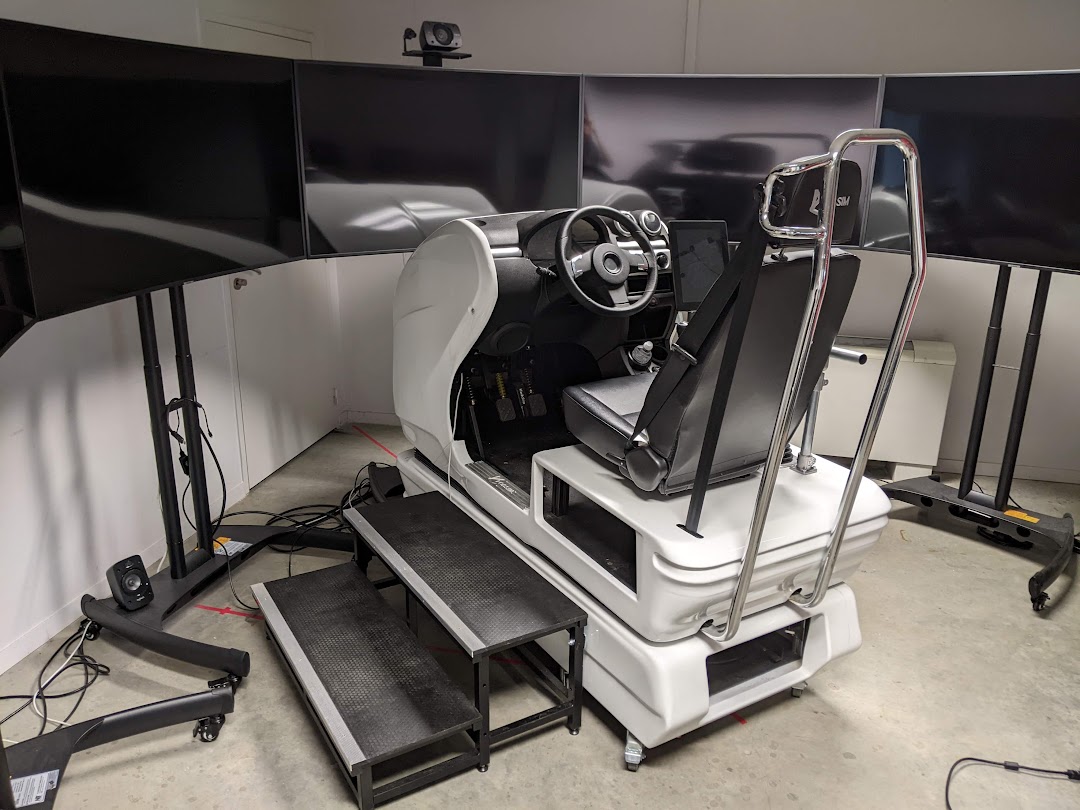
Ok, so now we have ourselves a nice scenario, in a nice scene, running in-editor on my desktop computer. How do we get it to run on the actual simulator, which so happens to have 6 computers, in an custom LAN, two floors away? I make it sound like a complex task, but it’s really not. Once again, let’s break that down.
First, we package our project, so that we have an ready-to-use executable installed on the simulator’s core server. Then, we distribute that package on all computers in the cluster using Veyon (more info), which not only is super helpful to manage the cluster on a day-to-day basis, but also has built-in CLI. So just by powering on the simulator, the cluster can automatically update itself by fetching the latest build.
Then, it’s just a matter of using nDisplay’s shiny and new Switchboard to launch the package on all cluster nodes.
And there you have it, the scenario is running on the simulator. It obviously required a lot a work beforehand to make sure that this process is as smooth as possible, but it’s absolutely worth it.
Iterate
Now that we have our MVP running, let’s iterate, quickly. This lead to interesting development both in the experiment, but also in the workflow itself. Let’s cover the latter first.
Options
My researcher colleague was always eager to try out new developments. But one thing they really wanted is to actually fine-tune the cut-out scenario, so that there’s enough time for the takeover, but not too much; so that the lead car is close enough, but not too much; etc.
I could have set him up with our whole development environment, as our team did in another project, but that was not the ideal solution here. They’re not at all versed in driving simulation, Unreal, or anything related, so it wouldn’t be an easy move for them. Since the goal here was to move quickly, we went another way.
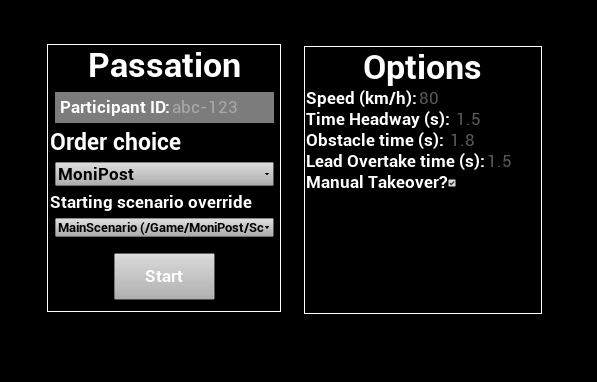
I added a few UI elements to our main Widget Blueprint based on the variables they wanted to play with. Those are directly fed into the scenario via the Open Level options.
Using that very simple UI, the researcher was able to test a very wide range of variants in an extremely short amount of time, on the actual simulator hardware, without any expert knowledge of our platform’s inner workings.
And options got added over time, based on researcher feedback. A checkbox to add a car in the blind spot? Sure thing! A slider to set its distance behind us in seconds? Can do!
That’s Workflow in progress. We didn’t know beforehand we’d be having options on the main menu, but that’s what ended up happening. And it was amazing not only having it, but being able to implement it that easily.
Local testing
Being able to test scenarios on the simulator is a very nice thing to have, but sometimes, it’s too much. It takes some time to startup/shutdown, and the whole process, even reduced to its minimal, still isn’t a single button to press for the researcher. Plus, it’s two floors away, and I’m lazy.
So what is the obvious solution to that? Well: why not have the scenario running on the researcher’s laptop? Why not indeed.
Since we’re already packaging a nice executable for the simulator, the easiest thing is to reuse that one. So by simply giving read access on the simulator’s server to the researcher, they can now grab any package and run it on their computer just by double-clicking the executable. And since the packaging script uses a Discord webhook to notify on completion, I don’t even have to tell my colleague when a new package is available, it’s all automated!
This new “local testing” allowed more granularity in the way we iterate, for zero additional cost.
StreamDeck
In a previous update, I mentioned that we acquired some StreamDeck to be used by the experimenter, to avoid having to memorize many keyboard shortcuts and reduce the risk of pressing the wrong button at the wrong time.
This project was the actual first use of those, and we’re very satisfied. We had a small number of actions for which we wanted manual experimenter input:
- Trigger the cut-out
- Stop the experiment
- Pause
- Reload the current scenario
- Move to the next scenario
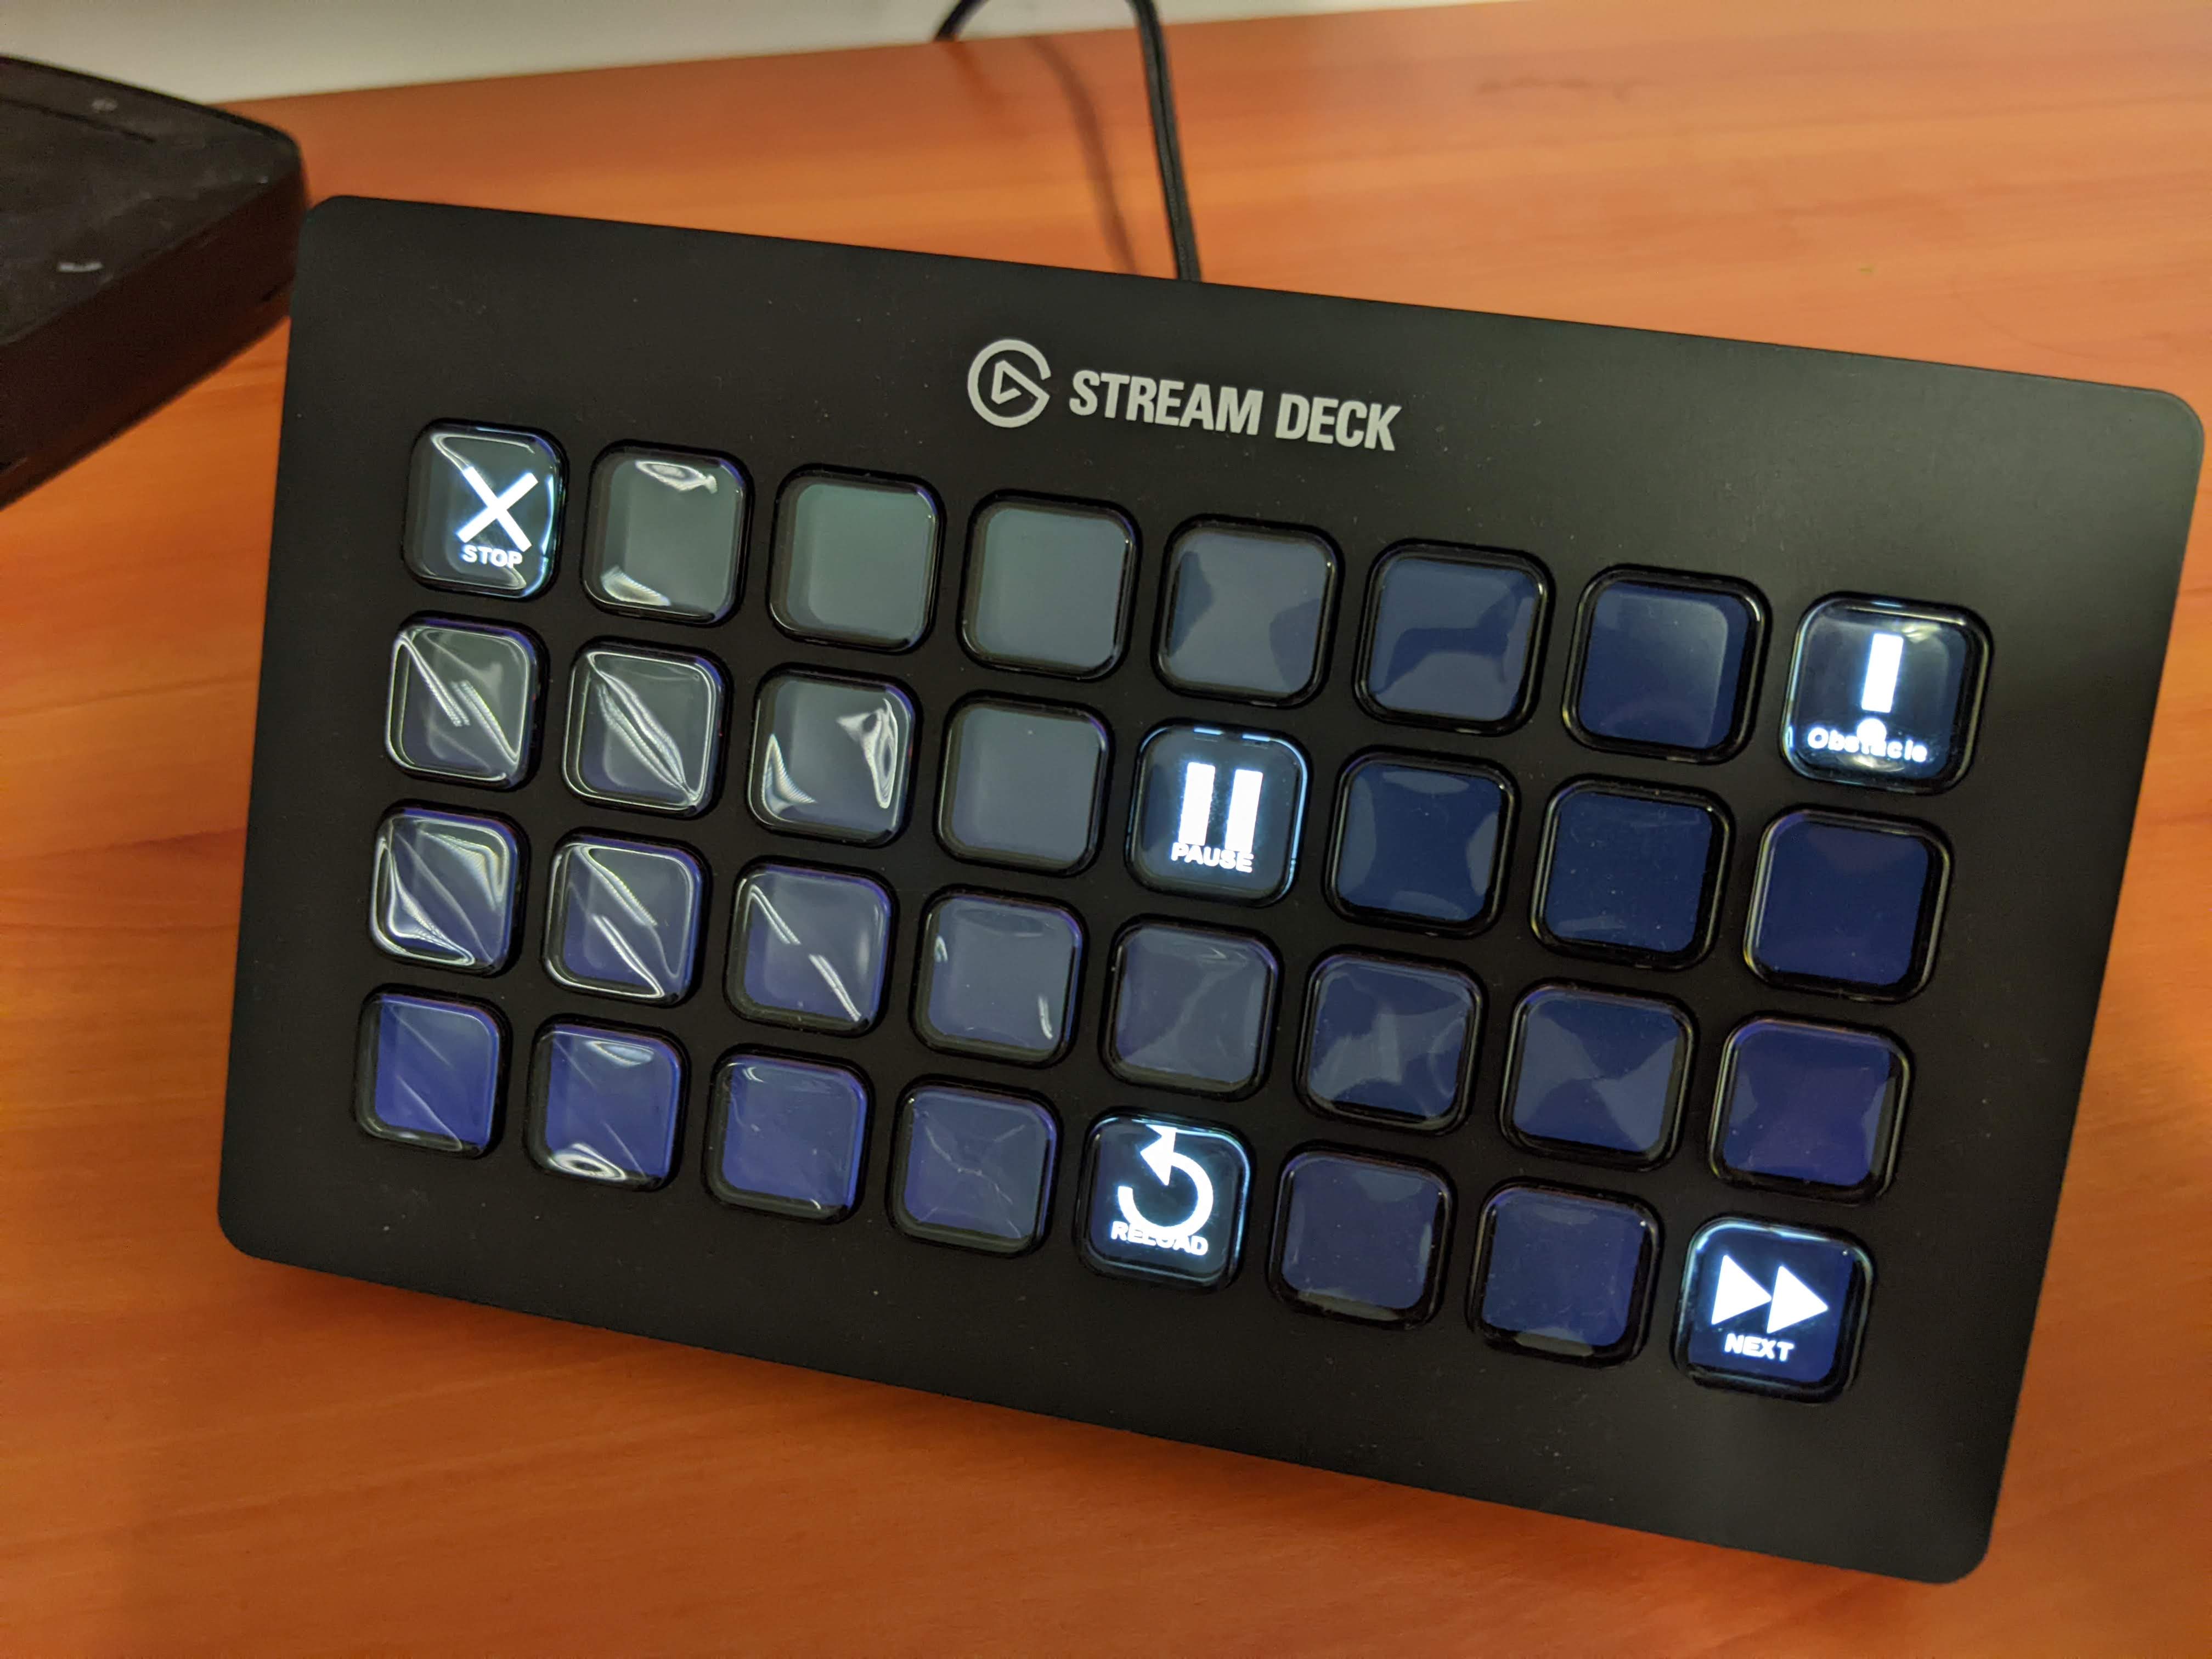
StreamDeck have its own icons store, with many (free) packs to choose from. It’s very simple to use and intuitive to set up. We spread buttons over the grid to avoid pressing the wrong one. I would have loved more color to icons, but still, having to use only this “button box” is a huge improvement for the experimenter, both for tests and the actual experiment.
Fade In
After just a few tests, one thing really struck me as a waste of (precious) time: the time it takes for the scenario to get to the cut-out situation. It probably takes around 30s for all vehicles to reach the required speeds and headway, which isn’t a big problem in itself. But multiply that by the over 30 runs each participant will have to perform, or probably the hundreds we’ll have to go through during testing, and you get some significant amount of time that could be better spent.
One way to help around that is to have all vehicles start with the target speed, which kind of works, but also kind of doesn’t. First, even though you can apply initial velocities to any actor in Unreal, the vehicles’ physics model have to catch up to it, which still takes a few seconds. On top of that, you have the Virtual Driver which also has to control the vehicle to try to maintain the goals we gave it. Not an easy task when the car is thrown at 110km/h at the same time as the engine is turned on; so you can add some more seconds of startup time.
But the main issue is for the participant. Going from blank screen to 110km/h probably will only add to the constant threat of simulator sickness, which is something of the upmost importance when working on driving simulation.
So to work around all those issues while still saving time, we decided to indeed start all vehicles at their target speed, but to keep all simulator monitors blank during that time. And since nothing is shown to the participant during this time, we can use our favorite time-saving trick: time dilation! And after a few seconds, once the scenario has reached its target cut-out ready state, we have a gentle fade-in to immersive the user in the simulation.
This rather simple trick has saved us some time, shorten the experiment duration and (maybe) lowered simulator sickness risks.
Workflow in progress
If you’ve read our previous entry, you might have realized that the two projects ended up having very different workflow. And I just love it. Every project, every collaboration is unique. There’s no single best way to move forward, and it’s just so wonderful to have tools that allow us to try every way we deem the best given the project’s circumstances.
I don’t even know what project will come next, who it’ll be with, or what the challenges will be, but I’m sure it’ll make for a great entry in this series!