Scenario Authoring
We’ve already talked about scenarios, which are at the very core of driving simulation. But this was a rather high level overview, and today I want to go a bit deeper to discuss how we’re actually implementing our scenarios, and how we try to make the process as easy and efficient as possible
Requirements
At LESCOT, we’ve been authoring a very wide range of scenarios for decades, and we’ve gathered a lot of feedback from it over the years. When we started working on our Unreal Engine platform, we used that to create a small set of requirements regarding scenario authoring, ensuring that what we were creating would fit our needs as much as possible.
Scripting design
In a previous article, I quickly went over “What are scenarios anyway?”, illustrating some of the complex use-cases we encountered. From experience, scenario requirements complexity only grows over time, and future experiments will need more attention to various details.
However, not all scenarios need to be complex. Or at least, not all parts of a scenario. We might want to create one or more abstraction levels, each with its own complexity. This is, for example, what we do with our scenario variants.
The reason behind all this is who designs and authors the scenario. The most common and natural way to describe a scenario is “When X happens, do Y”, and chain all that together, in a similar fashion to state diagrams. Researchers often think of scenarios that way, but depending on length and complexity, designing a whole scenario with that paradigm can become difficult to maintain. Engineers, on the other hand, might be more familiar with OOP and other methodologies, which might be easier to work with for experts, but too complex to grasp for non-programmers.
So all in all, we wanted our authoring process to allow a wide range of paradigms, from natural “when… do…” to complete programming language interface.
Testing
When authoring scenarios, the most time-consuming task often is testing. Once again, it depends on complexity, but if you have a 30+ minutes scenario, with lots of intertwined events, testing the part you’re working on can be frustrating if it occurs at the 20th minute. Usually, authors try to subdivide scenarios in individual parts that can be tested independently; but that’s not always possible, and you’ll always have to test the connections eventually.
We really wanted to try to improve that. Not only is this time-consuming, it’s especially frustrating to whoever’s doing it. And not only can frustration lead to errors, but we also want to make this authoring process as pleasant as possible for everyone involved.
Solutions
For each of our requirement categories, we’ll go over the solutions we implemented or envision. Our philosophy is always to avoid complex solutions, and to try to reuse existing features.
Scripting design
As discussed in a previous article, we mostly rely on Blueprint Visual Scripting to implement scenarios, which is the native Unreal Engine solution to scripting. It solves a lot of “scenario” issues by itself, but it’s not really enough for our requirements.
Stages
Most importantly, Blueprint aren’t state machines. They’re mostly designed for event-based scripting. Which, in theory, is what we want; “when… do…” is just that: react to events. However, video-games approach to events is mostly cartesian-distance based, whereas driving simulation is more road-time based. In other words, video-games rely on physical trigger volumes that can be placed in the world, and that will execute stuff when the player gets in it. Driving simulation is usually more interested in time between actors on a road, e.g., “When ego is less than 3s from the traffic light, turn it yellow”.
Not only do we want road-time events, but we also want them to happen in a very specific sequence, that we can have very strict control upon. Something like a state diagram, where we can ensure that everything will be played out the way we want to.
My solution to that is Stages. It’s a single new Blueprint node that allows implementing the “when… do…” paradigm in traditional Blueprint scripting.
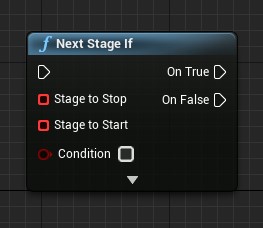
This node, along with Events, allows the scenario author to clearly define the sequence in which events will occur, and for each one, what will trigger it and what action will result from it. Since it’s only a single node, we can still use all the other Blueprint features and nodes; and users can rely on all associated resources when authoring scenarios.
This paradigm is also compatible with the more traditional cartesian-distance event system, or with any other that can be done in Blueprint. For example, we also try to split scenario per-actor (when applicable), and stages can easily be used inside each actor’s Blueprint. No limitation there!
And as you can see above, the Blueprint debugger works particularly well with this “stages” paradigm, as we can clearly see going through the stages. If you end up in the wrong stage, the debugger will easily tell you where you are and why you’re there.
Flow
Flow is an open-source community-lead Unreal Engine plugin.
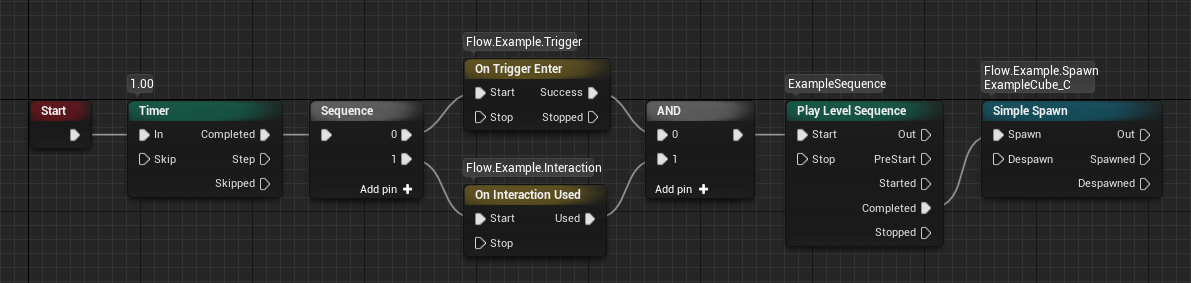
Flow plug-in for Unreal Engine provides a graph editor tailored for scripting flow of events in virtual worlds.
As soon as I read that, I was very interested in the plugin. It took me quite a while to fully grasp what the plugin offers, but I’m quite confident that this is the ultimate solution to scenario design and implementation in Unreal Engine.
But I haven’t even tried to implement a scenario with Flow, and I don’t plan on using it in the near future. Why, you may ask?
The plugin is still quite new and not officially supported by Epic Games, which means much less resources to help non-expert users getting started. And even though the idea behind Flow is fairly easy to understand, implementing an actual flow seems much more technical than a standard Blueprint. It feels like a lot of groundwork is required to create flow nodes (mostly in C++), tailored to our driving simulation use case, that can then be used in higher level flow graphs.
Flow really is something I want to explore as a solution to scenario design, but I think I’ll wait for both the plugin to mature, and for us to have a stronger experience in Unreal Engine. And with UE5’s Verse language around the corner, I think it’s safer to see what Epic’s new scripting language has to offer before jumping to an unofficial one.
But I really encourage you to check the Flow project out. It immediately garnered traction upon initial release, has lots of people interested and contributing, an active Discord server and a really experienced maintainer.
Testing
To make testing easier, we really went out of our way to have the easiest solutions possible, all the while bringing lots of improvements.
Automate ego
Having worked a lot on autonomous driving scenarios in the past years, I realized those were much easier to test. Indeed, as in real life, you don’t have to drive the car when testing! So at some point, it hit me: why not make all scenarios have an autonomous ego?
Obviously, traditional driving scenarios can’t have an autonomous ego vehicle during the experiment itself, but they can very much have one during testing. So that’s what we do: for each of our scenario, we implement the ego behavior we expect the participant to have in the ego vehicle’s Blueprint, using our own Virtual Driver, which is also used for all NPC vehicles.
One very obvious and immediate limitation is that participants aren’t machines, and they won’t all drive in the exact way we expect them; that’s actually kind of the point of most experiments, to study the different behaviors. But this fact is not an issue if you acknowledge it.
First, you have to realize that automating ego isn’t meant to replace manual testing. The process is just virtual prototyping applied to scenario authoring, so it’s meant to catch the “obvious” scenario mistakes. You still have to manually test your scenario, but if all goes well, you’ll need fewer runs of those before reaching your goal.
Second, you can add noise to your automation. When programming the ego vehicle, instead of setting it to follow a perfect 50km/h, you might want to add some random in there, let’s say between 40km/h and 55km/h. That way, each time you run an automated test drive, you’ll have a slightly different ego behavior, giving you a little bit more test coverage.
Using the “automate ego” philosophy, you can then rely on all standard testing techniques, from fuzzing to smoke testing and much more.
Time dilation
If you’ve automated the ego vehicle, then you probably don’t have any more manual input to the simulation. And without manual input comes a great gift: no need to follow realtime! Indeed, if all actors have preset behaviors, we can now run the simulation at 5x the normal speed. So if you’re working on a situation that occurs at 2 minutes into the drive, you can get there in a matter of seconds.
Unreal has a very simple way to do that: time dilation. You can set the time dilation factor at any point during the simulation. Which means you can speed up along the scenario parts you don’t care about, and slow down to realtime (or even slower) once you get near you situation of interest.
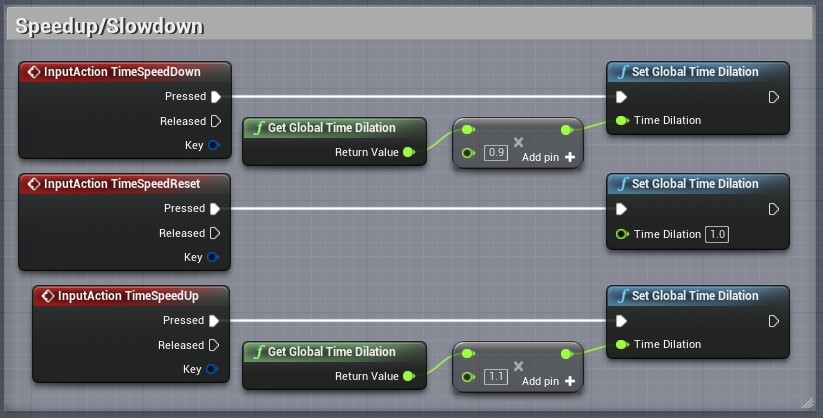
We use time dilation in two ways to help with scenario testing. The first, is by binding time dilation to the mouse wheel: wheel up, time goes faster; wheel down, slower; wheel press, realtime. It’s a very simple implementation, and actually one of the first thing I did when getting into Unreal. After that, just scroll during your automated test drive to get to where you want to be.
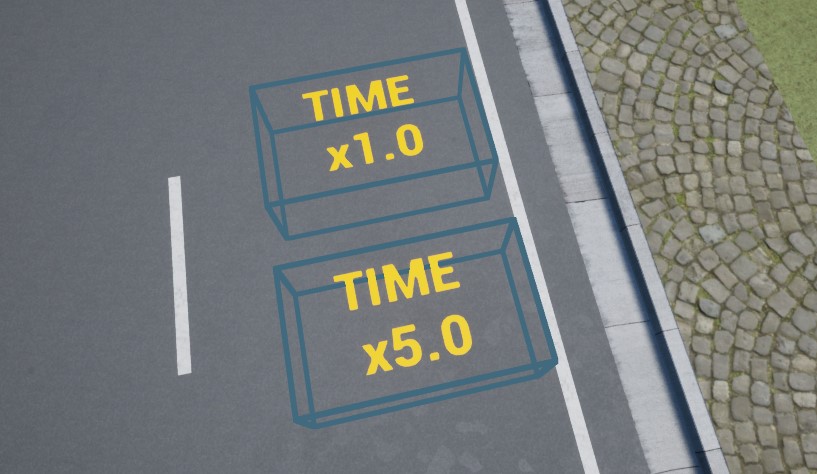
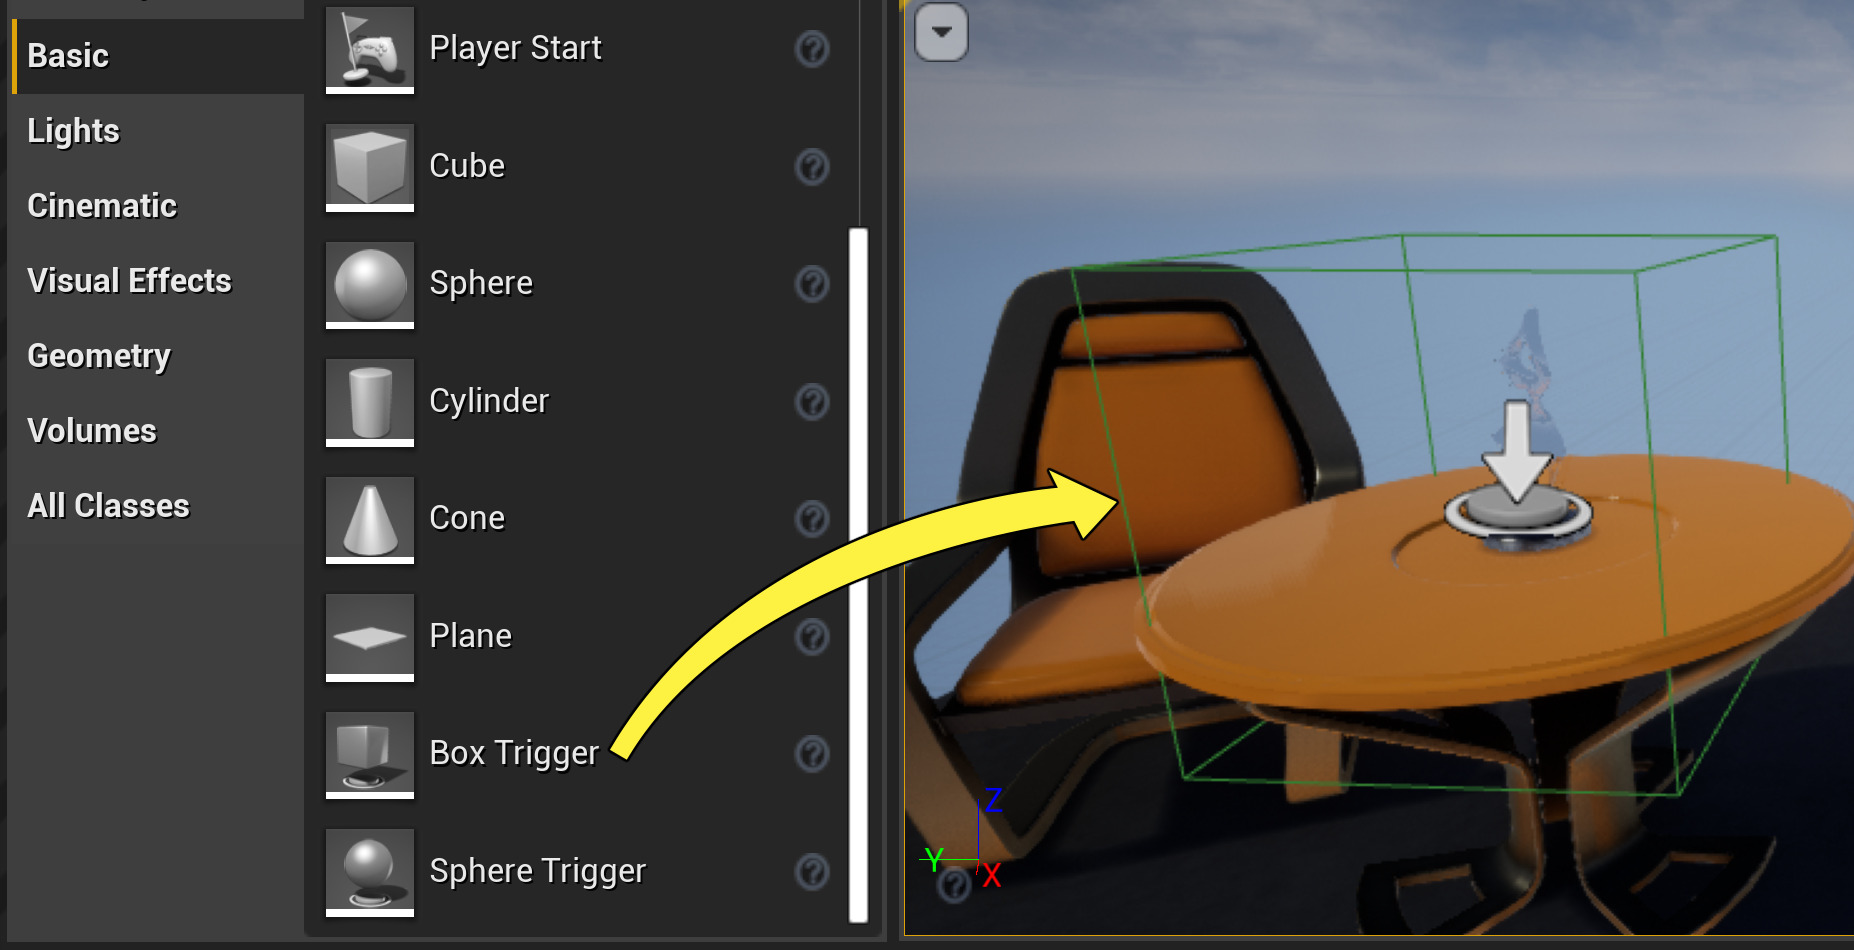
The second way we use time dilation is via trigger volumes. We have a simple Blueprint Actor which will set the time dilation factor when the ego vehicle gets into it. That way, you don’t even need to scroll anymore: just place your trigger boxes in the world, and time will adjust accordingly. This is especially useful when using Simulation In Editor (SIE), where you don’t have access to controller bindings, i.e., no scrolling.
Conclusion
To sum things up, we didn’t do much development to improve scenario authoring, but our minimal efforts still brought us a lot of improvements over previous workflows.
A single Blueprint node allowed us to work with natural “stages”, while keeping the Unreal native Blueprint editor. If that’s not enough, we could still look toward the very promising Flow plugin.
As for testing, programming the ego behavior, like any other scenario car, plus some basic time dilation, and we’ve managed to significantly reduce testing time and frustration.
And as with everything in our platform, we’re constantly improving, and always trying to make things better for everyone involved. The trigger-volume-time-dilation Blueprint was implemented… this morning!